Archivi categoria: quadcopterPi

progetto quadricottero controllato da raspberry PI

myR:Come controllare DC motor.3

This 3rd part is dedicated to the sw .

I use an approach object-oriented, so I prefer to create for each real component a equivalent sw  class object. It means that I try to include in the code all the parameters necessary to describe the item and its behavior.

The advantage of this approach is that if I need 20 motors, I just initialize 20 istances of my DCMotor Class.

The translation of this concept is very simple:Which parameters can describe can describe my motor?

The fundamental information is:  which is its speed? and than which are the limits of this speed?

Again, How phisically can control the motor, so which pins are used to set the speed?

All of this information are included in the init() of my class:

def __init__(self, name, MBack, MForw, channel1, channel2, WMin=-100, WMax=100, Wstall=30, debug=True,simulation=False):

MBack is the GPIO pin used to move the motor Backward, channel1 is the DMA channel used for it.

MForw is the pin for motor Forward. channel2 is the DMA channel used for it.

Wmin and Wmax is intuitive…

WStall is the  minimun speed that cause the motor not to move.

The actions that can be done onmy motor are:

1)Start the motor – in reality this just initialize the GPIO channels and pins.

def start(self):

2)Stop the motor – stop the GPIO channel.

def stop(self):

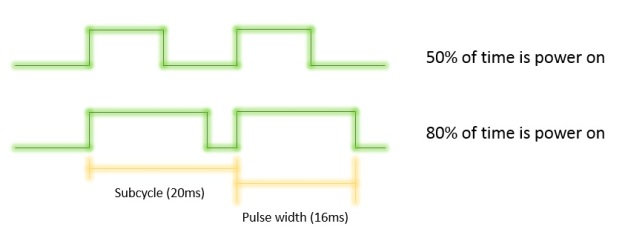
3)Set the speed W – check the speed is inside the limits,check if the motor is requested to move backward or forward , reset the unsued pin and set the pulse width of the correct pin.

 def setW(self, W)

Finally  by calling in a main routine those functions you can move your motor:

myDCmotor = DCmotor('myMotor', 18, 23, 11, 12)
myDCmotor.start()
myDCmotor.set(30)
#accelerate
myDCmotor.set(80)
#deelerate
myDCmotor.set(50)
#move backward
myDCmotor.set(-40)
#brake
myDCmotor.set(0)
#stop
#myDCmotor.stop()

You can download the code from Github-solenerotech/myRover

NOTES:During the programming , also when I added other devices like picmaera and ultrasound sensor I notice some bad behaviour on the GPIO system.For this reason you can find in the code some choices that are explained by this problems.

1)I notice that it is necessary to use one channel for each pin. Otherwise the pulse width is inverded ( if I set W=90% it runs 10% ans so on).  Thats expalin channel1 and channel2.

2)the DMA channels are used to create the PWM. But the DMA channels in rpi are used also for other activity. So you need to avoid some of them, in particular DMA channel 0  is used for the system and DMA channel 2 is used for the sdcard. So avoid those 2 channels.

3)In order to generate a PWM you can use hardware clock or sw clock. The hw clock is used also by Picamera, so this can generate an interference to the picam itself. To avoid this I’m using the sw clock on the PWM. This is obtained by using in the PWM setuput the option delay_hw=PWM.DELAY_VIA_PCM

myR:Come controllare DC motor.2

So, let’s first complete the wiring.

Each motor needs 2 signals, one for the clockwise movement, one for the counterclockwise movement.

I’m using the  GPIO 18 ,23,24,25  connected directly to the 4 inputs of the bridge.See the diagram below.

DCmotor4

Consider Motor 1. When GPIO 18 is high , the bridge set the Out1  also High and Out2 is the ground. And the motor turns cw. When GPIO23 is High the bridge inverts the outputs, so Out1  become the ground and Out2 is High and the motor turns ccw.

Finally , as we see in preview post, modulating the pulse width of the signal we can control the speed of teh motors.

myR: come controllare il DC motor

So let’s start  by moving the rover!

In my case I have 2  DC gear-motors with this specifications:

  • Gearbox: 4.8~7.2V
  • No load current:190mA(max.250mA)
  • Stall current: ~1A
  • No load speed: 90±10rpm
  • Torque: 800gf.cm

The control of this type of motor is really simple: when power on, it moves, when disconnected it stay still. Simple!

So what we can do is tuning the motor speed by  power on and off the motor itself using pulses of different width: we  will use the PWM (pulse width modulation).

DCmotor1

So consider  to send a pulse every 20ms (subcycle=20ms)  and  the pulse width is 16ms, than the motor stays on for the 80% of the time, while if the pulse width is 10ms it stays on for 50% of the time.

The motor can drain up to 250mA .It is too much for our raspberry output, so we need  a  bridge  in between than can guaranty this current.

That’ s why in the Bill Of Material I have the L298N bridge.

This board receive the input from rpi and send an output of the same width , with a signal level (voltage and current) depending on the power in  you connect ( the used battery pack).

In particular , the bridge I’m using can drive up to 2 motors.

DCmotor2

Below  the schema for the power connection. Note that the bridge can also provide a 5 V output than can be used to power the raspberry.

DCmotor3

In the next post, I’l explain how to connect the outputs and how to control them by software.

myR: sotto l’albero di Natale…

Under the xmas tree,  Santa put a  present for me including:

  • Dagu 4D MAgician Chassis (including 4 DC motors, and  2 plastic plates,4 x AA butteriy holder) -21 Eur
  • HC-SR04 sensor (a ultrasound sensor for measuring distance) -4 Eur
  • L298N bridge ( a bridge for controlling up to 2  motors) -4,5 Eur

In addition I had already:

  • raspberry pi
  • Pi cam
  • a wifi adapter
  • an omniwheel (spherical)
  • an empty  tic-tac candy holder
  • 4 X aa Batteries
  • a smartphone battery pack (2.5 A)

So I put every togheter and it pops out myR:  a super Rover!!!

WP_20151204_008

Nothing special under the sky, but an interesting project  to test autonomous veicles. So, to reach that goal , I’m now working on  a rover that can act in this 4 modes:

  • Jog mode, moved by operator ( my 5 years old son…).
  • Program mode: it is possible to create a sequence of movements and the rover can repeat them.
  • Discover mode: the rover can move randomly aroud the appartment avoid any obstacle in fornt of him.
  • Search mode: the rover can search and reach a ball placed or moved around.

As always I’m developing this features using python and  using object-oriented programming: for each item I create a module that implements all  the necessary features for this item.

In the next weeks I’ll post the development steps.

Happy new year and Keep in touch!

Are you still updating the blog?

In the last months I received  questions from followers  and from private e-mails about the state of  my project and this blog.

I reduced to zero the development mainly for the birth of my second baby. In addition my new job position did the rest : no more nights to dedicate to  my quadcopter.

I just  try a couple of time to fly : in  the second time in particular I obtained a broken prop…

By the way, It is really exciting to me, see so many contacts daily evenif I’m not for 6 months.

This give me new energy to restart.

So I cannot promise it , but I’ll try to be back on track!

myQrc Rilasciata

I just upload the last and final version of the myQ release candidate on github

DSC_6918

All the software has been debugged and tested.

All the functionalities are now stable.

I tested in different options (debug mode, netscan activated, sensor log) and the result is that I can run the main loop every 10 ms and get sensor data every 6 ms.

It can happen to have a delay on the sensor data loop when a log is added ( 2/3 ms).


I removed the webserver from the list of test to do, so it is not supported in this version of the software. The main reason is an instability when runnin gon raspberry. I have to investigate a more robust way to manage the comunication via browser.


Next time I will write a post the drone will be just landed…(after its first flight!!!)

L’ultima classe mancante e’ pronta: Display

TODO Tradurre

In those days I’m working mainly on the software in order to prepare the release candidate version for myQPI.

I’m going to merge all the functionalities (like motor test, pid tuning etc.) in one place.

So the last brick is a nice and smart user interface :

display

It is possible to read info about:

  • motor speed
  • roll,pitch and yaw from IMU ( the current value)
  • roll,pitch and yaw from remote controller ( the target value)
  • selected mode and commands from rc
  • PID values

Using the kayboard arrows, it is possible to switch between modes :

  • Init – where it is possible to load save and modify options (not implemented)
  • ESC – where it is possible to init the esc
  • Motor – wher it ispossible to move the motor singularly,for testing purpose
  • PID- where it is possible to tune all the pid parameters (implemented for roll and roll rate only).this is thinked to help during the testing phase with quad tied up on 2 side
  • Flying – where it is possible to guide the myQPI using the joystick command
  • UAV – where it is possible to define a specific path . This has been implemented by changing angles and trottle respect time.

Every mode has got its specific UI.For example in the picture you can see the PID mode, where the user has to ackwoledge the motor start, can start the PID control and then tune the kp,ki,and kd.

This module called display.py is available on my Github repo. In addition you can find the whole current development (not yet completed tested on the real quad!) .

If you are curious, yuo should be able to run it by the command python myQrc.py . I can see the program running also in my development pc, without raspberry connected.It should work also for you.

So the appointment is for the next post where I’ll officially launch the release candidate!

Beta2test. Prima delle vacanze

Durante l ultima settimana ho introdotto alcune migliorie sul codice che devo riportare qui prima di dimenticarle dopo le imminenti vacanze.

  • aggiunto possibilità di tuning manuale al volo per P,I e D.
  • in pid.py aggiunto una funzione per calcolare la media sul valore di D_correction calculation.Questo aiuta ad avere un valore più arrotondato.
  • Aggiornamento risultati sul display ogni 0.2 sec, invece che ad ogni ciclo (per ridurre il carico CPU ).
  • migliorato log
  • Calcolo della velocità angolare (roll_rate, pitch_rate and yaw_rate) in sensor_py. Questi valori sono ottenuti dalla derivata di roll,pitch e yaw già filtrate col complementary filter. Non come row roll_rate,pithc_rate e yaw rate del giroscopio.

il principale miglioramento e’ comunque stato l introduzione del PID per roll_rate (picth_rate and yaw_rate). Ho creato beta2.py dove ho messo due PIDs in serie. Questo è un tipico approccio per il controllo dei droni. Il primo PID restituisce la Roll_correction. (cioè di quanto voglio far variare l angolo in un passo).

Dividendo Roll_correction per cycletime, si ottiene l la velocità angolare che voglio ottenere in un passo.Questo e il target per il nuovo roll_rate PID. Mentre il feedback e’ la velocità angolare calcolata in sensor.py. Il risultato è un quadricottero molto più stabile, meno nervoso e più pronto.

sotto Ho riportato i primo test.

Beta2_pid_tuning


come si può notare e’ ancora presente un oscillazione, comunque compresa fra +/- 1 gradi. Occorre lavorare ora per fare in modo che il sistema raggiunga il target.(ora e’ sempre sotto). Probabilmente occorre incrementare il valore di P ed I.

Beta1test. Bachi e passi avanti

Ieri ho ottenuto questo risultato:

beta1_graph1

Grazie alle seguenti azioni:

1)Il test con la semisfera montata sotto il quadricottero non mi convinceva piu’. l’attrito, i limiti sulle rotazioni dovuti al pavimento sono vincoli non presenti nel volo.

Per cui ho deciso di passare alla soluzione piu usata e riconosciuta , appendendo il drone con due fili.

beta1_tied_up

2) A questo punto mi sono accorto che c’era qualcosa di anomalo nel comportamento dei motori. Eseguendo   beta1.py  il suono del motore era discontinuo e instabile anche se non avevo ancora attivato il controllo PID , ma mantenendo la velocità costante.

Questo non accadeva se eseguivo  motor_test.py.

Alle fine sono riuscito a riprodurre il problema e ho riscontrato un baco (o meglio un comportamento inatteso)  nella libreria RPIO. Ho riprodotto il problema con il loop sottostante :

while true:

mymotor.servo.set_servo(self.pin, PW)

sleep(0.01)


La spiegazione che mi son dato e’ che cad ogni chiamata di  set_servo() , viene resettato a zero il segnale e poi settato nuovamente al valore desiderato di PWM.

Pertanto ho usato una funzione a piu basso livello :

myMotor.PWM.add_channel_pulse(1,self.pin,0,PW)

A questo punto nel loop ho ottenuto un suono del motore (e quindi la sua rotazione) perfetto stabile e costante.

Questi 2 miglioramneti mi hanno permeso di fare un passo avanti. Il tuning puo’ procedere in modo piu’ veloce.

Sopra e’  mostrato il grafico del comportameto attuale.In blu in roll target , in rosso la posizione reale del roll. Devo migliorare il tuning per ridurre il tempo necessario a stabilizzarsi (ora 5/6 seconds)e per eliminare le oscillazioni ( +/- 3 gradi). Ma sono comunque soddisfatto della situazione attuale.

Beta1 test, preparazione

Questo post introduce alla prossima fase di test

Sto sviluppando il software per gestire i 4 motori e l’IMU.

Questa la modifica della struttura:

beta1_frame_bbeta1_frame


Ho aggiunto una mezza sfera attccata sotto, in modo da creare una condizione di disequilibrio.

Ho verificato che le eliche non possano toccare il pavimento in nessuna condizione.

L’obiettivo e’ riuscire a vedere il quadricottero rimanere in orizzontale aggiustando da solo l’orientamento (roll and pitch).

Let’s try!